Please note any backorders can take up to 2 weeks to dispatch. Local to Sheffield? Avoid Postage charges & pickup direct from us. Free delivery on orders over £30. Dismiss
Recipes feature heavily on the ‘Ome Made Blog. There are lots of different ones to choose from.
Curries are covered in depth with the different methods of cooking them from traditional dishes to B.I.R style using curry base sauce or gravy.
Some of the recipes feature ‘Ome Made Curry Masalas, rubs and seasonings, with ideas on how to use them.
BBQ recipes are included including Pulled Pork and even what to do with the leftovers such as Pulled Pork Chilli.
Many of the dishes featured on the ‘Ome Made Blog are centred around spices. Not all hot and spicy though! There are some subtly spiced and warming dishes such as Slow Roasted Moroccan Lamb.
There is even the odd dessert and sweet thing including the school dinner classic Crispy Cornflake Tart!
It’s that time of year again! It seems like the Kids have only just gone back to school and then the next thing you know Halloween is here!
We normally let the kids stay up a bit later on Halloween. They don’t go out trick or treating but they love it when other children come knocking on our door.
We have our own bag of tricks and treats to give out… we have a bag full of sweet things but lurking within are a few unpleasant surprises that I have made. In the past we have had chocolate coated sprouts, last year it was chocolate coated Fishermans Friends! This year… Ahhh, that would be telling!
Kit will have used her artistic skills to make them all masks. A task which needs a lot of patience! For those that haven’t got as much may want to head over to The Amazon Halloween Store
I’m sure we will have to have a pumpkin carved out. I can’t wait until the kids are old enough to do it themselves!
We tend not to cook something special for Halloween. If anything we’ll have some jacket potatoes and fillings. Easy to prepare and fuss free. Although we quite often have baked beans with them.
Now there’s nothing wrong with the tinned variety but you just can’t beat ‘Ome Made!
It’s really quite easy to make your own baked beans and of course it’s loads cheaper. You really can customize your recipe.
Here’s a recipe that I’ve used many times. I used to make these when I was working at a Bar opposite the Sheffield Crucible and Lyceum. There was one gentleman that used to come in especially to have beans on toast (even though it wasn’t on the menu!) because they were so good!
‘Ome Made Baked Beans
500g dried Haricot beans (soaked overnight in cold water).
800g of chopped tomatoes (tinned or fresh)
140g tomato puree.
250ml of water.
2 teaspoon of veg bouillon.
3 cloves of garlic
1 teaspoon of chilli powder.
2 teaspoons of paprika.
2 teaspoons of dried basil.
2 teaspoons of dried oregano.
2 teaspoons of dried parsley.
3 teaspoons of sugar.
Seasoning.
Method
Drain and rinse the beans. Place the beans in a pan and cover with water. Bring to the boil and boil for ten minutes. Turn down the heat and simmer for another twenty minutes.
Drain the beans and then put in a casserole dish or oven proof pan along with all the other ingredients. There should be enough liquid to cover the beans, if not add a little more water. Put a lid on the pan and place in an oven preheated to 160°C (140°C if fan assisted). The beans should be ready after 6 hours but could happily left for 8.
This basic recipe could easily be customized to your own liking. You could try adding some fried onion, bacon, a bit of diced pork or even sausages. A little diced carrot and/or celery gives your beans a bit more depth.
If your really brave you could make your own curried beans… just don’t blame me for the after effects!
Sometimes, not very often but sometimes we have a meal which is quite simple and not spicy. Well, not that spicy!
Shepherds pie is one of those dishes. We don’t have it that often at all, so when we do it’s a real treat.
It’s one of those really comforting foods. Perfect for when the weather turns a bit cooler… like it did… in August!
Oh and it has to be lamb. None of this using minced beef and passing it off as shepherds pie, that’s Cottage Pie!
This recipe is a very basic recipe for Shepherds Pie. Proper Shepherds Pie. Like your Mum used to make but better! Not curried Keema Shepherds pie. Not Clapshot Pie and not Shepherds pie where you’ve ponced about slow roasting a leg of lamb, used the juices to make the gravy and with anchovies in etc. Plain and simple Shepherds Pie.
This recipe will give six to eight portions so you could halve it if you don’t want to make so much. Or why not get some foil containers so you can do some individual portions which can be put in the freezer for another day.
Shepherds Pie
1.2 Kilo minced lamb
2 medium onions diced
4 cloves garlic finely chopped
4 medium sized carrots diced
Seasoning
1/2 teaspoon chilli powder
1/2 teaspoon of ground ginger
1 tablespoon soy sauce (dark)
2 tablespoon plain flour
2 litre of hot stock (chicken or beef)
For the mash
2.5 Kilo potatoes (I find red are good for mash, or Maris Piper)
1 large egg
25 gram butter
1 tablespoon milk
Seasoning
To make the filling heat a little oil in a heavy bottomed sauce pan and add the onion, garlic and carrot. Fry for a couple of minutes until the onion is translucent and beginning to colour. Add the minced beef, stir to break it up add the seasoning and spices and fry until the meat has browned. Add the soy sauce and stir. Take the pan off the heat and stir in the flour. Put back on the heat and add the stock a little at a time stirring all the time until the mixture comes to a simmer. This now needs to cook for at least 45 minutes. Don’t worry if it looks a lot of liquid. You strain the meat to go in your pie dish so you are left with a lovely gravy to accompany your meal.
To make the mash. Peel the potatoes and 1/2 or 1/4 them depending on size. The bigger the size the fluffier your mash will be. Put in a pan and just cover with cold, salted water then put on to boil. Once up to the boil your potatoes should take 30 – 45 minutes to cook. Once cooked drain and put back in the pan. Give the potatoes a quick blast of heat from the hob and then leave them until the steam reduces to nearly nothing at which point you potatoes should be nice and dry. Throw in the butter and then mash your potatoes once broken up add the milk, beaten egg and seasoning and mash until smooth. Don’t overdo the potatoes otherwise you will end up with something resembling wall paper paste!
Now to assemble the finished dish. Strain the filling from the gravy using a slotted spoon, small sieve or colander into a deep baking dish or two. Reserve the leftover sauce to use as a flavour filled gravy to go with your pie. Don’t leave it next to the sink though or your better half may think you don’t want it and throw it down it! Once you have strained all the meat and veg into your dish carefully place the mash potato on top of the meat and gently spread out with the back of a spoon. Use a fork to put some ridges in the topping and if you want put a little sliced tomato on top.
To cook put in a pre-heated oven at 190°C or 170°C for fan assisted for around 50 minutes or until the topping is nicely browned.
Serve with the reserved gravy and whatever veg you fancy (peas go great!)
It was a nice sunny day in the summer holidays. We had said our good-byes a few days before to our child from Belarus that had been staying with us for a few weeks healthy respite. So it was just Us and our Kids. Time to chill out and relax.
Our Kids had been eager to get their bikes out and have a ride around the local park. And that’s exactly what we did!
Off we set along with a bag of stale bread to throw to the ducks.
Our Kids had a good ride, plenty of exercise and fresh air on their bikes and the ducks were well stuffed.
On the way back home we decided to do a bit of foraging. On the way into the heart of the park we had noticed a patch of brambles with a few Blackberries peeking out that maybe warranted further investigation. And I am glad we did. After 30 minutes of scrambling about in the bushes and us shouting the kids “Don’t pick the ones near the ground… a dog may have peed on them!”, we returned home with just short of a kilo of plump, juicy blackberries.
Blackberry crumble seemed like a good idea but then I remembered I had a bit of leftover shortcrust pastry in the fridge but only enough for a base. Hmmm, what to do?
I’m pretty sure someone (Kit!…She has all the good ideas….) mentioned ” Bakewell tart but with blackberries” and there it was. Decision made.
I can’t call it Blackberry Bakewell tart though because to be honest it bears no resemblance to a Bakewell Tart!
Strawberry Jam (enough to coat the bottom of your tart… Ooo er!)
Blackberries (700 – 800g)
Caster sugar for sprinkling over the tart.
For the Frangipane:
100g/4oz butter at room temperature
100g/4oz caster sugar
2 medium eggs, beaten
100g/4oz ground almonds
30g/1oz self raising flour (a traditional frangipane uses plain but I wanted mine to rise into the blackberries)
To Make
Roll out your pastry to about 1/4″ thick and line a well greased flan tin/dish with it.
Slap on a good dollop of strawberry jam and spread to cover the base of the tart.
To make the frangipane cream the butter and sugar together until light and fluffy. Gradually beat in the eggs and then stir in the ground almonds and flour.
Spread the frangipane on top of the jam.
cover the frangipane with the blackberries and sprinkle with caster sugar.
Bake in a preheated oven at 200°C/gas mark 6 for 40 – 50 minutes.
Let the tart cool for at least 20 minutes before serving. We had ours with some ‘Ome Made vanilla and Strawberry ripple ice cream. The leftover tart was nice cold, straight from the fridge.
I’m writing this and It’s making me realise… we are very, very lucky in this country.
Sometimes I don’t think we realise just how lucky we are?
I have been fond of kebabs since my beer swilling teenage years… You could not beat that garlicky, salty meat stuffed into a pita with slice cabbage, grated carrot, raw onion, sliced tomato and cucumber then drizzled with lemon juice, yoghurt & mint and hot chilli sauce after a night out on the beer!
Of course once I had kids, nights out were a thing of the past and a greasy donner kebab became something I’d have once in a blue moon.
And then I noticed that when I was having them I was enjoying them less and less. The meat seemed to have less flavour, you got less salad,yoghurt and mint seemed to not be an option and ask for lemon juice and you got funny looks. And why can’t you get a kebab in a pita anymore?
It seems that a lot of takeaways standards have dropped these days. And to be fair there is a lot of dubious establishments out there selling things they shouldn’t be to make a bigger profit. Not that I want to tar all takeaways with the same brush… there are of course some excellent takeaways out there.
The thing is, sometimes you just fancy a kebab. So it’s handy to be able to make your own.
If I had my way I would have a big rotisserie spit in one corner of the kitchen but I don’t think Kit would approve!
So how do you get something that tastes and has the texture of a Doner meat?
I’ve found the best method is what I refer to as ‘The Big Sausage’ method!
So here’s how you make it;
You will need
1 kilo lamb mince (or beef, or a mixture)
3-4 cloves of crushed garlic
1 teaspoon salt
3 teaspoon ground cumin
1 teaspoon ground coriander
1 teaspoon chilli powder
1 teaspoon cinnamon
1 teaspoon dried oregano
Plenty of black pepper
1/2 tablespoon oil
Put all the ingredients in a large mixing bowl. The best way to mix is with your hands, so get in there and give it a good squish. The more like a paste you can get it the better.
Once all the ingredients are well combined get a large sheet of greaseproof paper and a large sheet of tinfoil.
Lay the greaseproof paper on top of the tinfoil and then get your meat mixture and lay it out in a line, round about 12” long. Now mold the meat into a ‘Big Sausage’ shape. Once you have a rough sausage shape you can roll it in the greaseproof paper to get it nice and round and compact. Wrap your ‘Big Sausage’ in the greaseproof and then the tinfoil. Lay the package on a baking sheet or dish (some juices may escape) and put in an oven at about 165°C (145°C for fan assisted)for around 80 – 90 minutes.
The meat will now be cooked. To serve slice the meat thinly and place on a baking sheet before giving it a flash under a hot grill.
The meat can then be served in a pita bread with Turkish Salad, yoghurt and mint and of course a good dollop of chilli sauce (preferably ‘Ome Made!) or as I’ve done here in a gigantic Naan bread which is then rolled up and sliced (and by the way if you wrap it tightly in cling film and put in the refrigerator overnight, it slices really nice and is ideal served cold on a picnic or as pack-up).
So for Easter Sunday this year we decided to have Thai.
We were having friends and Family around for Dinner so we decided to keep it simple.
So of course it had to be Thai Fishcakes and the ubiquitous Thai Green Chicken Curry. These were complimented by some nice crunchy pickled vegetables, cucumber sauce and Thai sweet chilli sauce.
The fishcakes were made a couple of days beforehand and re-heated in the oven for 35 minutes beforehand, they reheated really well and saved time on the day. The Thai green curry paste was also made in advance to save time.
Unfortunately there are no pictures of the Thai Green Chicken Curry (I’ve put one in of a previous creation) but I’ve included the recipe anyway for anyone that wants a go.
First up the pastes. These will make more than you need but if you fry them in some oil and put them in sterilised jars they will keep in the fridge for six weeks or so. By the way if you’re one of those Veggie or Vegan types you can omit the shrimp paste.
Thai Green Curry Paste
Makes 180g/6oz
2 teaspoons coriander seeds (or two level teaspoons ground coriander)
18 small, hot green chilli peppers
2 stems of lemongrass
3 tablespoon galangal sliced (or ginger)
1 tablespoon kaffir (if you can get them, normal if not) lime zest
30g/1oz coriander (if you can get it with the root on add that too)
6 cloves of garlic peeled and chopped
60g/2oz shallots or onion chopped
1 tablespoon shrimp paste
1 teaspoon ground cumin
1 teaspoon salt
2 teaspoon ground white pepper (yes you can substitute black but white gives a truer and better flavour)
Add all the ingredients (starting with the hardest first) into a food processor or wet grinder and blitz to a smooth paste adding a little oil if necessary.
Thai Red Curry Paste
10 – 15 dried red chillies (soaked in hot water for twenty minutes or so)
1 teaspoon ground coriander
2 stems lemongrass sliced
6 cloves garlic peeled and sliced
60g/2oz shallots or onion sliced
3 tablespoon galangal or ginger sliced
1 1/2 tablespoon shrimp paste
2 teaspoons salt
2 teaspoons ground white pepper
add all the ingredients into a food processor or wet grinder and blitz to a smooth paste as above.
Thai Fish Cakes (Tod Man Pla)
this makes approximately 22
375g/13oz white fish (haddock, cod, Pollock!)
1 large squid tube
1/4 portion of red curry paste (roughly a tablespoon)
1/2 tablespoon fish sauce
1 teaspoon softened palm sugar or dark brown sugar
2 kaffir lime leaves soaked in hot water
55g/2oz yard-long beans (or any round green bean) cut into thin slices
1 small egg beaten
Prepare the fish and squid taking the bones and skin off the fish and removing the backbone, beak and intestines from the squid then rinsing. Roughly chop and process the fish in batches into a smooth paste. CurlyE was helping me with this – “Urgghhh! that looks like snot!” to be fair he was right! Mix in the other ingredients with just enough egg to bind without being sloppy.
Form the mixture into balls using about a dessert spoon of mixture for each one (having a bowl of cold water and keeping your hands wet will stop the mixture sticking to your hands). Flatten your balls into disks about 5mm thick.
place the fishcakes on greaseproof paper on a tray (if all the ingredients were fresh and not previously frozen they can be flash frozen at this stage).
To cook from fresh deep fry for approximately 3 minutes, from frozen give them about 4 – 5 minutes.
Pickled Vegetables
We love pickled vegetables in our house. They make a lovely side dish to all South East Asian food. Even a bit of poached chicken on some plain boiled rice is livened up and made into a tasty refreshing dish with the addition of them.
The choice of vegetable is up to you. In this instance we used baby sweet corn, onion, carrot strips, white cabbage and some green beans. We also did one jar with some sliced chilli in, some like it hot! The pickling liquor is quite light, so these will not keep for months but they should keep for a couple weeks in the fridge.
To make your pickling liquor you want roughly 50/50 vinegar to water, some sugar to taste and some bits n bobs in it to flavour (Lemongrass trimmings, coriander seeds, garlic, ginger or whatever takes your fancy).
Simmer the mixture for 20 – 30 minutes until the sugar has melted and the flavours have infused the liquor.
Prepare your veg and place in a colander over a bowl. sprinkle with salt, give it a toss and leave for 20 minutes to draw some of the water out. after twenty minutes give the veg a rinse, drain and then put in clean jars (sterilised if not using within a week). Strain your vinegar liquor while still hot and pour over the vegetables to cover. It will be ready after 24 hours.
Sorry it’s not much of a recipe but it’s just one of those things I do on the fly!
Sweet Chilli/Cucumber sauce
In a pan put 175ml/6 fl oz water, 250g/9 oz sugar, 2 teaspoons salt and 175ml/6 fl oz white vinegar. Bring to a simmer and simmer until the sugar has dissolved.
Put 1/2 of the above mixture in a serving bowl, add a dash of fish sauce and light soy sauce. Finely dice some cucumber and add to the sauce. And that’s the cucumber sauce done.
To the remaining vinegar mix in the pan add 2 teaspoons of dried chilli flakes or a couple of finely diced fresh red chillies and two teaspoons of strawberry or raspberry jam. Bring to the simmer again and cook until the jam has dissolved, that’s your sweet chilli done.
Thai Green Chicken Curry
Enough for 6 – 8 people
30g/1oz fresh coriander
1 generous tablespoon green curry paste
4 kaffir lime leaves (soaked in water if dried) shredded
1 heaped teaspoon dark brown sugar or a couple lumps of palm sugar
a dash of soy sauce
a dash of fish sauce
some Thai basil leaves shredded
2 Thai red chillies thinly sliced
juice of two limes
Blitz the fresh coriander in a food processor. Heat some oil in a large pan and add the curry paste, fresh coriander, lime leaves and the spices. Fry for a couple of minutes, stirring so the mixture doesn’t burn. Add the coconut milk, bring to a simmer and cook on a low heat for a couple of minutes. Add the chicken and if necessary enough water to just cover the chicken. Bring to the simmer and cook gently, covered for approximately 10 minutes. Add the rest of the ingredients and simmer for a further 5 minutes or until the chicken is cooked. Serve with some plain rice or noodles and a little pickled veg and mango salad on the side.
Mango Salad
Dice a whole mango and place in a serving bowl. Add a dash of vinegar, black pepper, a sliced red chilli and a sprinkling of soft dark brown sugar. Top with some toasted and crushed cashew nuts before serving.
So that was our Easter Sunday Dinner. It might not have been traditional but it was damn good!
Oh… yes there was dessert but it was just a boring old trifle… and erm…. the custard didn’t set… whoops!
The trifle was a bit sloppy but that wasn’t going to stop me!
I was winding an old friend up a couple weeks ago who happens to be a Vegan, he also bears an uncanny resemblance to Jack Sparrow, especially when he gets the full costume on…come on, stop swooning ladies!
Anyway to make it up to him I promised I would put a post on the Blog that featured a Vegan recipe. So Steve… ahem, sorry, Captain Jack ‘A-Hoy mi seafarin’ shipmate. Shiver mi timbres an get ya cooking pot at the ready!”
Ok it might not be Salmagundi (every pirates favourite) but it is Vegan and it’s packed full of protein which sometimes can be lacking in a Vegan diet
‘Ome Made Houmous (Hummus to our friends over the pond…) with Pitta Bread & Turkish Salad
Houmous is dead easy to make and so much better than shop bought. My recipe makes a lot! It’s easy to halve or quarter the recipe though. Or you could freeze the extra. It will keep in the fridge for up to ten days providing its in a sealed container.
For the Houmous you will need:
500g dried chick peas soaked overnight (you can use canned)
1 jar Tahini (300g)
About 10 cloves of garlic (or more or less depending on your taste) chopped
Zest & juice of of two lemons
About 200ml olive oil or sunflower will work fine too
Plenty of slat and freshly ground black pepper
Ground paprika
To Make:
Drain and rinse your chickpeas. Place in a deep saucepan and cover well with water. bring to the boil and boil for ten minutes. Remove any scum that floats on the surface.
After your chickpeas have boiled for ten minutes, turn down to a simmer and cook for another 45 minutes or until tender.
Once cooked, drain and let the water evaporate from them while you prepare the rest of the ingredients.
Once your chickpeas have cooled a little mix all the ingredients, except the paprika, in a large bowl and put through a blender or food processor or if your a true pirate you can use a masher or the back of a fork, it will just end up a little more course. If the mixture is a little dry and thick you can add a little more oil or some cooled down boiled water.
Once your Houmous is ready put into a serving bowl and sprinkle with a little paprika.
For the Pitta Breads you will need:
(makes 8)
350g strong white bread flour
1 teaspoon salt
2 teaspoons dried yeast
2 tablespoons oil (olive or sunflower)
250 ml warm water
1 teaspoon sugar
To make;
Mix the sugar yeast and water together in a jug. After 10 – 15 minutes it should have a nice foamy head.
Mix the flour and salt together in a large bowl. Add the olive oil, make a well in the centre of the flour and pour your water/yeast in. mix together to form a soft dough. take out the bowl and give a knead for a good 5 minutes using a little more flour if the dough is still sticky.
Put back in the bowl and cover with a damp cloth or cling film. Leave for an hour to rise.
Put your oven on the hottest setting it will go on
Once ready knock back the dough and knead again until smooth. Divide the dough into eight balls and then roll each out into an oval about 1/4” thick. Place on a greased baking sheet and leave to prove for 10 minutes.
Cook the pittas in the pre-heated oven for about 1 – 1 1/2 minutes each side. When ready wrap the Pittas in a clean tea towel to keep warm.
To make the Turkish Salad
Finely shred 1/2 a white cabbage. Grate one or two carrots. Slice one medium sized onion.
Mix the cabbage, carrot and onion in a bowl. Sprinkle approximately two teaspoons of salt and the same of sugar over the salad and mix again.
Squeeze the juice of one lemon or a tablespoon of bottled over the salad and a couple dashes of white wine vinegar. Give the salad a good grind of black pepper and a pinch of ground cumin., mix again and the salad is ready to serve. It will keep for a good five days in the fridge.
To serve split your warmed Pitta breads and spread liberally with the houmous. Pack in as much salad as you can. You know have a Vegetarian/Vegan equivalent of a Kebab! You can of course sprinkle some Chilli Sauce (in our case, ‘Ome Made) over and it does benefit from some yoghurt and mint (but then that wouldn’t be vegan).
So there you have it. ‘Ome Mades first ever Vegan recipe.
Mike, our butcher, had got a couple of Ox Cheeks in. I’ve never had them before but I thought I’d give them a go.
I’d read about them and understood that they needed a nice slow cook. Apparently they make an absolutely wicked chilli, or should that be cheeky chilli!
I think the bit of Irish in me had attuned to the fact that St Patricks day was approaching so I decided to cook these cheeky chappies in Guinness (other stouts are available…)with a few flat mushrooms, carrots and onions and serve them with a good dollop of Champ, that comforting dish of mashed potato with spring onions and lots of butter!
I have to say that I was not disappointed with the results. After quite a few hours of cooking I had a gorgeous dark gravy and the cheeks were moist and succulent and had a lovely beefy flavour that reminded me of a cross between beef shin and Ox tail.
The Cheeks went a long way too. They are quite rich due to the gelatinous nature of them so a little seems to go a long way. You shouldn’t pay a lot for them either which makes them a real bargain.
With the leftover meat, champ and gravy I made some potato cakes with the meat in the middle, baked them in the oven and served them with some peas and the leftover gravy… I’ll tell you something, leftovers don’t get much better!
I would recommend anyone to give Ox cheeks a go. They are a very forgiving meat to cook as long as they are cooked for plenty of time, they are cheap and extremely tasty. Don’t be put off by the look of them or the part of the animal they are from. They really are delicious which is probably why all the celebrity chefs are coming out with recipes for them… lets hope they don’t succeed in pushing up the price of these cheeky little morsels!
Recipe (to serve 8 adults)
2 Ox Cheeks (about 900g – 1 Kilo
1 large or two medium onions chopped
2 garlic cloves chopped
4 large carrots cubed/sliced
8 – 12 flat mushrooms sliced
Plain flour (some)
About 400ml beef stock
2 x 500ml bottles of Guinness
1 or two star anise
1 Tablespoon muscavado sugar or other dark sugar
Pinch of thyme
Good pinch of salt to taste and a really good grind of black pepper
For the Champ
2 kilo peeled potatoes
2 bunch spring onions (12-16)
50 gram butter
200ml milk
Method
When we had this we prepared it the day before we were going to have it so that it could be put straight in the oven to be ready for teatime. It’s a good idea to do if you have a busy day.
First off dice your onions and finely chop your garlic and fry gently in a large oven proof pan. Add the carrot, thickly sliced and continue to gently fry.
Prepare your Ox Cheek by taking off the outer thick bits of fat and any thick bits of membrane. Don’t worry too much about the state of your cheeks being perfect, after a long slow cook they’ll be fine.
Once the onion has softened and the carrot is stating too take on a bit of colour add your cheeks to brown.
Heat your stock ready to go in the pan.
Once your cheeks are nice and brown sprinkle over some flour to roughly coat everything in the pan. Continue to cook gently for a couple more minutes.
Add your stock a little at a time while giving everything a bit of a stir. You should end up with a thick paste. If it’s a little lumpy don’t worry as after a long cook it should cook out.
Now pour in your two bottles of Guinness. Remember to do a quality control taste on each bottle before adding!
Add the rest of the ingredients and bring to a simmer.
Once the liquid has come to the simmer you can either take off the heat, cool and refrigerate to cook the next day or it can be put in the oven to finish off.
The Stew can be cooked,covered, on 165°C for three hours or 150°C for about six hours. We put our stew straight in the oven from the fridge. We put it in a cold oven set to 150°c where it stayed for three hours and then we turned it up to 160°c for another three hours, after which it was cooked perfectly. The cheeks were lifted out of the gravy to rest while the gravy was put in the oven uncovered to reduce slightly.
As for the champ, well thats dead easy. Peel and cut your potatoes into approximately 1 1/2’’ chunks. Plonk into a pan and just cover with water, bring to the boil and simmer for about 30 minutes or until tender. Drain the potatoes and put on a very low heat until the steam almost stops (meaning all the excess water has evaporated and you’ll have nice fluffy potatoes).
While your potatoes are finishing, put the onions, milk, butter and seasoning in a pan and warm gently allowing all the flavours to infuse.
When your potatoes are ready give them a good mashing and then fold the milk, butter and onion mixture into the potatoes.
Once your ready to plate up the Ox cheeks can be sliced or pulled apart with a fork. Simply put a dollop of Champ into a dish, place some Ox cheek on top then ladle some gravy over the top. We finished our dish off with a little purple sprouting broccoli.
A nice cheap meal that really tasted like something you should be paying a lot of money for in a trendy ‘Gastro’ pub.
Happy St Patricks Day everybody… enjoy your Guinness, in moderation… of course!
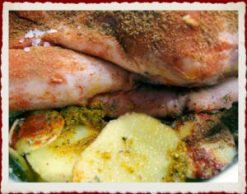
Here’s a traditional English dish given an ‘Ome Made twist, to be fair it was Kits’ idea. I was just going to do the plain English dish of lamb shoulder baked on top of layers of potato and onion, which in it’s own right is delicious. Add some spice, herbs and a curry sauce though and it takes the dish to a completely different level… This really was scrumptious! This is a fantastic dish to prepare the day before so that you can bang it in the oven the next day, forget about it and get on with all those things you need to catch up on, take the kids out or… go to the pub!
It really is simple. You will need a full or 1/2 shoulder of lamb. Some White potatoes, onions and garlic. I also used some dried mint, fresh coriander and some red chillies.
First of all slice some potatoes (skin on) thinly and some onions. These need to be layered in a deep buttered baking dish. I did about four layers adding seasoning as I went along. On the middle layer I put a heap of chopped fresh coriander, a couple of chopped red chillies and some dried mint. On the top layer I sprinkled some more mint and some black cumin seeds.
I then fried some mild curry masala in a little oil and added some chicken stock and let this cook for twenty minutes or so. Next prepare the lamb. With a sharp knife make a few slits in the meat and push in some pieces of garlic. Now rub the lamb all over with some Kashmiri Chilli powder and some ground cumin. Sit the lamb on top of the layered potatoes and onions and give it a good grind of black pepper and a good sprinkling of salt. Pour your curry sauce into the corners of the baking dish. You want enough so that it comes about 1/2 way up your potato and onion layer.
Now cover the whole baking dish with a double layer of foil, creating a tight seal.
When your ready to cook pre heat your oven to 200°c. Put the lamb in the oven and then turn the temperature down to 165°c Which means the lamb will be ready after about four hours (but should be fine up to six). If you want to cook it for longer (or your having a really long session in the pub!) then you can cook the lamb on 145°c. The lamb will then be ready after six hours but be even better after around eight hours. To finish the dish off, remove the baking dish from the oven. Carefully remove the lamb to a warmed plate or dish. The meat should be falling off the bone. The layered potatoes then need to go back in a hot oven to brown and start to crisp up. If the liquid is above the potatoes just spoon some off ’till you can see the top layer. Put the baking dish back in the oven for about twenty minutes.
To serve, pull apart the lamb, spoon out some potato into a dish and place the lamb on top, spoon a bit more of the curry sauce over. A nice dollop of natural yoghurt goes nicely with the dish but that’s all it really needs.
A tasty, warming and comforting dish for a lovely lazy Sunday. Give it a go!
Don’t forget you can buy ‘Ome Made Curry Masalas at www.omemade.co.uk
Born on the 27th February 2014 we would like to introduce you to …. Bob!
Bob is a sourdough bread starter, or will be providing I can keep him alive for long enough!
I’ve made bread starters before but I’ve never kept them after they’ve made their first batch of bread. Bob however I intend to feed and nurture and see how long I can keep him going.
I have to say I’m not feeling confident. You see it’s all a bit scientific. Flour to water ratios, temperature, how much flour to feed, blah blah blah. I can’t be doing with all that so I’ll be truthful and say… I’m winging it!
For those of you who fancy having a go at ‘winging it’ too you will need some flour. I used some strong white flour and a little malted grain. I used the malted grain because it has whole grain in it which, if I understand right, has more of the natural yeasts present which are needed to get your bread going. The malted grain also contained rye which again is supposed to make a good starter.
I put the flour in a tall kilner jar and then added water to make a paste the consistency of single flour. I then put the lid on and left it.
A couple of hours later he looked like this…
This is not good…
If I was a puritan I should probably have ditched the mixture and started again. However I’m ‘winging it’ so I chucked in a bit more flour, gave it a mix and left it.
On day 2 it looked better but still had water separating so I added more flour again. It did smell nice, a bit like beer, which is good… I think?
We don’t have them very often so when we do it’s a real treat.
Our children have never been to a McDonalds, Burger King or any other junk food purveyor.
I can imagine that when they do (although I’d like to think they never will…) it will be a real eye opener for them. I can just see them going back to the counter with the sad little burger in hand… “What’s this? You call this a burger?”
I don’t know why more people don’t make their own? You can buy a kilo of mince meat for a lot less than it costs for a kilo of burgers. All you need to do is add a bit of seasoning, mix and form into a rough Pattie and throw on a grill, BBQ or frying pan.
However you can let your imagination run wild and flavour your meat with a vast array of ingredients.
And then you have your toppings, now this is where the fun starts!
You have to have cheese of some sort. I love a slice of Monterey Jack on a beef burger, but a medium cheddar is just as nice. If you want to ‘Posh’ it up I would go with some crumbly Stilton. One of my favourite burgers is a Mediterranean influenced lamb burger topped with a piece of grilled Halloumi and some ‘Ome made Tzatziki.
I like a nice mustardy mayonnaise on my beef burgers along with a little salad leaf, slice of tomato and I’m sorry but gherkins are good too. I also think a beef burger needs a good squirt of tomato ketchup.
Lately we have been making veal burgers. I know that some people are a little put off by veal but the place that we get it from uses the male animals from the place that they get their milk supplies from. If the animals are not sold for meat then they would be slaughtered at birth anyway. So personally I haven’t got a problem with eating veal that’s a by-product of the dairy industry, and from some where that has high standards for animal welfare.
Mince veal has quite a delicate flavour and it makes a really nice burger that compliments other ‘add ons’.
Heres a recipe you might want to try but feel free to add your own ‘add ons’ as everyone has different tastes. The burgers could be made with any sort of meat though.
Ingredients
1.2Kg veal mince (or beef or lamb), Waitrose often have a deal on veal mince, hence the amount which would cost £10
1 teaspoon salt
1 teaspoon sugar
A really good grind of black pepper
A couple teaspoons of mustard. Dijon or wholegrain works best
And that’s it, although you could add other things if you fancy. Get your hands in the bowl and give it a really good ‘squish’ to thoroughly mix the ingredients into the meat.
I then line a tray with greaseproof paper, form the meat into burgers, place on the tray and chill which lets the burgers firm up a little. If you’re finding you have more meat on your hands than tray a tip is to shape the burgers using slightly wet hands. You may notice on the photos that we made some little meat balls from the same mixture, these were used in the Kids’ pack-up for their school lunch (I never got pack-up as good as theirs!), they would be equally as good in a tomato sauce with some pasta for a quick lunch or supper.
And that’s it your burgers are ready to go and be cooked using your preferred method.
So we had these little beauties topped with Chorizo, Monterey Jack cheese, an ‘Ome made tomato and habenero chilli salsa and some rocket and baby spinach leaves all sandwiched in a mini Ciabatta bun with a squirt of American style mustard spread on for good measure.
The salsa is really easy too if you want to have a go. Just dice some tomatoes, onions and chillies (which can be left out if you don’t want the heat). Add enough sugar to lightly coat the mixture, a little splash of vinegar and a good squirt or squeeze of lime juice. It now needs a good pinch of salt (I personally like a nice salty salsa)and a good grind of pepper. Again a salsa can easily be customized to your own liking.
We had these with some nice chunky baked chips and a little more salad leaf on the side.
Be prepared for juice dribbling down chins and arms, but then that’s all part of the enjoyment!
And don’t forget to tell you’re kids how much nicer and healthier Home-made burgers are compared to the high street, mass produced crap of fast food vendors!
Manage Cookie Consent
We use cookies to optimise our website and our service.
Functional
Always active
The technical storage or access is strictly necessary for the legitimate purpose of enabling the use of a specific service explicitly requested by the subscriber or user, or for the sole purpose of carrying out the transmission of a communication over an electronic communications network.
Preferences
The technical storage or access is necessary for the legitimate purpose of storing preferences that are not requested by the subscriber or user.
Statistics
The technical storage or access that is used exclusively for statistical purposes.The technical storage or access that is used exclusively for anonymous statistical purposes. Without a subpoena, voluntary compliance on the part of your Internet Service Provider, or additional records from a third party, information stored or retrieved for this purpose alone cannot usually be used to identify you.
Marketing
The technical storage or access is required to create user profiles to send advertising, or to track the user on a website or across several websites for similar marketing purposes.