We started drinking Chai a good year ago now. Not proper Indian Chai but the well known brand, tea bag variety.
Recently however the well known brand that we used decided to re-brand their packaging, putting less tea bags in and charging more. Meaning our bag of Chai cost more than twice as much!
Now we like Chai but paying 25p a bag seemed a bit much! Sod it I thought I’ll make my own!
D’ya know what? It’s dead easy. The only downside is you have to strain the tea before drinking but to be fair thats not that much of a hardship!
You can also customise your blend to your own taste.
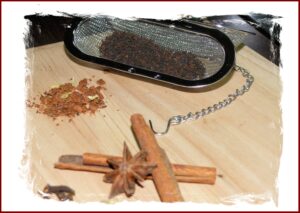
I roughly ground some cinnamon, star anise, cloves and cardamoms which I then add to some loose black tea in a teapot and let infuse for 5 minutes. That’s it done, all you have to do is strain the Chai as you pour it out and add milk and sugar to taste.
If I had had any to hand I would have added a little dried ginger (not ground though as that would be too powdery).
If you want to give it a go here are the amounts I used;
4 sticks of cinnamon, 6 star anise, 8 cloves and 5 cardamom pods
Pulse the above in a coffee or spice grinder so they are roughly ground, you don’t want a fine powder.
Use roughly 1/4 teaspoon of this mixture with one teaspoon of tea per mug of Chai.
At some point I will have a go at brewing a proper Indian Masala Chai. For this the whole spices are simmered in the water with the tea before milk and probably a little too much sugar is added.
Here is how Rick Stein recommends doing it in his excellent book Rick Stein’s India.
Ingredients;
1 black cardamom pod, bruised with a rolling pin
15 green cardamom pods, bruised with a rolling pin
6 cloves
4 black peppercorns
8cm piece of cinnamon stick, broken in 1/2
500ml water
4 tsp black tea leaves (equivalent to about two bags if using bags)
2tsp sugar, plus extra to taste
200ml milk
Method
Put the spices into a saucepan with the water. Bring back to the boil, add the tea and turn down the heat to low and simmer for 7 minutes. Stir in the sugar and milk, bring back to a simmer for 3 minutes. Strain through a fine strainer and serve, adding more sugar to taste.
You could try making the delicious Indian sweet Jalebi to go with your Chai. Mr Stein has a recipe from the same book the above recipe is from.
Right… think I’ll go and make myself a nice cup of Chai!
So for Easter Sunday this year we decided to have Thai.
We were having friends and Family around for Dinner so we decided to keep it simple.
So of course it had to be Thai Fishcakes and the ubiquitous Thai Green Chicken Curry. These were complimented by some nice crunchy pickled vegetables, cucumber sauce and Thai sweet chilli sauce.
The fishcakes were made a couple of days beforehand and re-heated in the oven for 35 minutes beforehand, they reheated really well and saved time on the day. The Thai green curry paste was also made in advance to save time.
Unfortunately there are no pictures of the Thai Green Chicken Curry (I’ve put one in of a previous creation) but I’ve included the recipe anyway for anyone that wants a go.
First up the pastes. These will make more than you need but if you fry them in some oil and put them in sterilised jars they will keep in the fridge for six weeks or so. By the way if you’re one of those Veggie or Vegan types you can omit the shrimp paste.
Thai Green Curry Paste
Makes 180g/6oz
2 teaspoons coriander seeds (or two level teaspoons ground coriander)
18 small, hot green chilli peppers
2 stems of lemongrass
3 tablespoon galangal sliced (or ginger)
1 tablespoon kaffir (if you can get them, normal if not) lime zest
30g/1oz coriander (if you can get it with the root on add that too)
6 cloves of garlic peeled and chopped
60g/2oz shallots or onion chopped
1 tablespoon shrimp paste
1 teaspoon ground cumin
1 teaspoon salt
2 teaspoon ground white pepper (yes you can substitute black but white gives a truer and better flavour)
Add all the ingredients (starting with the hardest first) into a food processor or wet grinder and blitz to a smooth paste adding a little oil if necessary.
Thai Red Curry Paste
10 – 15 dried red chillies (soaked in hot water for twenty minutes or so)
1 teaspoon ground coriander
2 stems lemongrass sliced
6 cloves garlic peeled and sliced
60g/2oz shallots or onion sliced
3 tablespoon galangal or ginger sliced
1 1/2 tablespoon shrimp paste
2 teaspoons salt
2 teaspoons ground white pepper
add all the ingredients into a food processor or wet grinder and blitz to a smooth paste as above.
Thai Fish Cakes (Tod Man Pla)
this makes approximately 22
375g/13oz white fish (haddock, cod, Pollock!)
1 large squid tube
1/4 portion of red curry paste (roughly a tablespoon)
1/2 tablespoon fish sauce
1 teaspoon softened palm sugar or dark brown sugar
2 kaffir lime leaves soaked in hot water
55g/2oz yard-long beans (or any round green bean) cut into thin slices
1 small egg beaten
Prepare the fish and squid taking the bones and skin off the fish and removing the backbone, beak and intestines from the squid then rinsing. Roughly chop and process the fish in batches into a smooth paste. CurlyE was helping me with this – “Urgghhh! that looks like snot!” to be fair he was right! Mix in the other ingredients with just enough egg to bind without being sloppy.
Form the mixture into balls using about a dessert spoon of mixture for each one (having a bowl of cold water and keeping your hands wet will stop the mixture sticking to your hands). Flatten your balls into disks about 5mm thick.
place the fishcakes on greaseproof paper on a tray (if all the ingredients were fresh and not previously frozen they can be flash frozen at this stage).
To cook from fresh deep fry for approximately 3 minutes, from frozen give them about 4 – 5 minutes.
Pickled Vegetables
We love pickled vegetables in our house. They make a lovely side dish to all South East Asian food. Even a bit of poached chicken on some plain boiled rice is livened up and made into a tasty refreshing dish with the addition of them.
The choice of vegetable is up to you. In this instance we used baby sweet corn, onion, carrot strips, white cabbage and some green beans. We also did one jar with some sliced chilli in, some like it hot! The pickling liquor is quite light, so these will not keep for months but they should keep for a couple weeks in the fridge.
To make your pickling liquor you want roughly 50/50 vinegar to water, some sugar to taste and some bits n bobs in it to flavour (Lemongrass trimmings, coriander seeds, garlic, ginger or whatever takes your fancy).
Simmer the mixture for 20 – 30 minutes until the sugar has melted and the flavours have infused the liquor.
Prepare your veg and place in a colander over a bowl. sprinkle with salt, give it a toss and leave for 20 minutes to draw some of the water out. after twenty minutes give the veg a rinse, drain and then put in clean jars (sterilised if not using within a week). Strain your vinegar liquor while still hot and pour over the vegetables to cover. It will be ready after 24 hours.
Sorry it’s not much of a recipe but it’s just one of those things I do on the fly!
Sweet Chilli/Cucumber sauce
In a pan put 175ml/6 fl oz water, 250g/9 oz sugar, 2 teaspoons salt and 175ml/6 fl oz white vinegar. Bring to a simmer and simmer until the sugar has dissolved.
Put 1/2 of the above mixture in a serving bowl, add a dash of fish sauce and light soy sauce. Finely dice some cucumber and add to the sauce. And that’s the cucumber sauce done.
To the remaining vinegar mix in the pan add 2 teaspoons of dried chilli flakes or a couple of finely diced fresh red chillies and two teaspoons of strawberry or raspberry jam. Bring to the simmer again and cook until the jam has dissolved, that’s your sweet chilli done.
Thai Green Chicken Curry
Enough for 6 – 8 people
30g/1oz fresh coriander
1 generous tablespoon green curry paste
4 kaffir lime leaves (soaked in water if dried) shredded
1 heaped teaspoon dark brown sugar or a couple lumps of palm sugar
a dash of soy sauce
a dash of fish sauce
some Thai basil leaves shredded
2 Thai red chillies thinly sliced
juice of two limes
Blitz the fresh coriander in a food processor. Heat some oil in a large pan and add the curry paste, fresh coriander, lime leaves and the spices. Fry for a couple of minutes, stirring so the mixture doesn’t burn. Add the coconut milk, bring to a simmer and cook on a low heat for a couple of minutes. Add the chicken and if necessary enough water to just cover the chicken. Bring to the simmer and cook gently, covered for approximately 10 minutes. Add the rest of the ingredients and simmer for a further 5 minutes or until the chicken is cooked. Serve with some plain rice or noodles and a little pickled veg and mango salad on the side.
Mango Salad
Dice a whole mango and place in a serving bowl. Add a dash of vinegar, black pepper, a sliced red chilli and a sprinkling of soft dark brown sugar. Top with some toasted and crushed cashew nuts before serving.
So that was our Easter Sunday Dinner. It might not have been traditional but it was damn good!
Oh… yes there was dessert but it was just a boring old trifle… and erm…. the custard didn’t set… whoops!
The trifle was a bit sloppy but that wasn’t going to stop me!
After a fantastic Summer the temperature has dropped and it’s looking a little gloomy outside… (although now I am writing this it seems Summer is making a comeback!) but that’s ok, it means it’s time to start cooking those lovely comforting foods!
And what could be more comforting than a big old fashioned Meat & Potato pie, or two!
It was handy that our friendly butcher had just had delivery of a nice highland cross cow then (cross as in hybrid breed, not a bit ticked off!)
When I’m slow cooking beef for stews or pies I love to use the shin. After hours of cooking it is lovely and tender, sticky and sweet and it gives your gravy soooooo much depth of flavour and because of the gelatinous nature of the cut it naturally thickens your gravy too.
As a bonus, because we had the whole shin we got to take the bones away too to make a lovely ‘Ome-made beef stock.
And of course I couldn’t resist popping along to the local off licence (Cheers Mr Mitchell!) to get a couple bottles of ale to make the gravy with. I used Badger Breweries Poachers Choice. A lovely dark beer flavoured with Damsons. It always reminds me of Autumn and Winter. It’s one of those beers that gives you that lovely warm fuzzy feeling, ideal for drinking on a cold winters night around an open fire. Of course some of the beer didn’t make it into the finished product!
So we have lovely rare breed, high welfare beef. ‘Ome-made beef stock to make the gravy, enriched with some rich fruity beer. A crumbly, butter laden, golden pastry crust… It all sounds fantastic but I’m sure there is something missing?
Of course! A good friend to share it with!. Cue Pete, now lets get stuck in!
First job is the stock.
If you don’t have the bones, the time or you just rather wouldn’t make your own then that’s fine. Just replace with bouillon or stock cubes.
I made this the day before I made the pie as I wanted to use the stock to cook the meat in.
So, I used the whole shin bone. Mick at the farm shop kindly cut it into three pieces so that it could fit in our stock pot.
First of all I roasted the bones a few carrots and a couple of onions in a moderate oven for roughly 45 minutes. this just starts to caramelise the flesh, fat and sinew that’s left on the bones which will help give your stock a deeper flavour and a lovely dark colour (in fact to help with this I sprinkle a bit of sugar over!).
I then put the bones, onion and carrots in a stock pot, covered with water and put on to boil. whilst the water comes up to the boil I added 1 star anise, roughly 5 bay leaves, a teaspoon of black pepper-corns and a generous pinch of thyme. The stock can now be left for a couple of hours (ours was on for about four!) simmering away.
After a few hours, or more if you have the time, you need to take the bones out of the stock and strain the stock into another pan. You can now add your ale, wine or anything else you want to flavour the stock with. This then needs to be reduced by about two thirds by boiling vigorously.
If there is any marrow left in the bones, scoop it out and whisk it into the stock to enrich it. In our case if MissT is knocking about then it won’t make it that far, she absolutely loves bone marrow!
The stock needs to cool and ideally be refrigerated so that the fat can solidify and be skimmed off. It is then ready to use.
Cooking The Pie filling
I cooked the meat in big pieces. This allowed me to cook the meat for a long time to allow the fat and connective tissue to break down, make the meat melt in the mouth, add flavour and texture to the finished gravy.
I used 3 Kilo of Shin. This made 2 pies to feed 10 – 12 hungry people. Of course you could easily half the amount or if you can’t manage two pies you can freeze one portion of the cooked mixture to make another pie or a stew at a later date.
Generously coat your meat with seasoned flour (the easiest way to do this is to put the flour in a plastic bag, add your meat a bit at a time and give it a good shake!).
Heat some oil in a heavy bottomed pan and then gently fry your meat until it has a nice golden colour. then add your stock to just cover the meat. bring to a simmer, cover and then put in the oven at 130°C/260°F for four hours.
In our case we now took the kids to their swimming lessons (which takes about three hours!). If however you don’t have swimming lessons to do then I could recommend; mowing the lawn, cleaning the chickens out, fixing the leak under the sink or best of all going for a nice pint at your local!
Once the meat is cooked it can be taken out of the gravy put on a plate and covered with cling film to keep it moist.
The rest of the filling can now be added to the gravy to cook. I used around 1/2 Kilo of potatoes in big chunks, a couple of carrots cut up in big chunks a couple of medium sized onions roughly sliced and about 250g of baby button mushrooms left whole. Just chuck the whole lot into the gravy and then put back into the oven at 175°C/350°C for about an hour or until your potatoes are just cooked through.
The Pastry
I used short crust this time around. You could use puff (bought from the shop is fine) or rough puff. if you have a favourite recipe for pastry then you could use that. For two pie lids I used roughly 1 kilo of flour, so adjust your recipe to suit. I rubbed in 375g of butter to 1 kilo of flour with a couple of level teaspoons of salt added. I would normally use some lard (300g butter and 75g lard) however I had run out so to the mixture I added a couple tablespoons of beef suet. In the end it worked rather well!
Once the fat is rubbed into you flour add enough cold water (I throw a couple ice cubes in the water to really chill it) to just bring the pastry together. briefly knead and then wrap in cling film and leave to rest for at least twenty minutes.
Creating The Pie
While your veg is finishing cooking make a thick roux by melting roughly 55g of butter in a heavy based pan. Once sizzling add approximately 2 tablespoons of flour and stir for a minute until you have something that resembles golden brown putty. Put to one side. This will be whisked into your gravy to get a perfect consistency.
select your pie dishes and break the meat up into them. I like to leave it fairly chunky.
Using a slotted spoon remove your cooked veg from the gravy and place among the meat.
Put the gravy back on a gentle heat. You can now add any extra flavourings you want. I added a generous splash of Worcestershire sauce. You want a nice thick gravy for your pie so whisk in the roux you prepared earlier, a little at a time until you have the desired consistency.
Ladle the gravy over your pie mixture. You want some of the filling to be peaking out so the pastry has something to sit on top of. You should have a little gravy left over to serve along side your pie.
Roll out your pastry to cover your filling. It wants to be just under a centimetre thick. Place the pastry over the pie dish. don’t stretch it over. You want a bit of give to allow for the pastry shrinking. Trim the edges and put a couple holes in the middle to allow steam to escape. Decorate with the excess pastry if you want and then generously egg wash the pie topping.
The pie now needs to be cooked for 50 minutes to an hour on 195°C/380°F (if using a fan oven reduce the temperature by about 20°C/70°F). Once your pie is golden brown and your filling red hot the pie is ready, however it will benefit from being left for fifteen minutes or so before serving.
We had ours with Mushy Peas (or as Pete called them ‘Steeped Peas’) and gravy.
Pies don’t come much better than this and when you have the fantastic company of an old friend it makes for a memorable meal!
Local to Sheffield? Avoid Postage charges & pickup direct from us. Please note any backorders can take up to 2 weeks to dispatch. Dismiss
Manage Cookie Consent
We use cookies to optimise our website and our service.
Functional
Always active
The technical storage or access is strictly necessary for the legitimate purpose of enabling the use of a specific service explicitly requested by the subscriber or user, or for the sole purpose of carrying out the transmission of a communication over an electronic communications network.
Preferences
The technical storage or access is necessary for the legitimate purpose of storing preferences that are not requested by the subscriber or user.
Statistics
The technical storage or access that is used exclusively for statistical purposes.The technical storage or access that is used exclusively for anonymous statistical purposes. Without a subpoena, voluntary compliance on the part of your Internet Service Provider, or additional records from a third party, information stored or retrieved for this purpose alone cannot usually be used to identify you.
Marketing
The technical storage or access is required to create user profiles to send advertising, or to track the user on a website or across several websites for similar marketing purposes.