British Indian Restaurant Curry And how to Make It!
Scroll down for a basic recipe for Curry Base Gravy and how to use it!
Just like any other food curry has it’s trends and opinions on how to make it. In this article we will find out what British Indian Restaurant Curry is and how to reproduce it in your own home.
I have been following the trend for British Indian Restaurant (BIR) style curries for many years, starting in the 90’s when Pat Chapman started his series of books. Recently Dan Toombs, Misty Ricardo and a handful of other curry aficionados have taken over the mantle.
The British Indian Restaurant style of cooking curry relies on the use of a basic curry powder and a special ‘mix powder’ as well as the use of a ‘base curry sauce’.
Base Curry Sauce
The base curry sauce is basically a thin type of stock/soup. Onions, garlic and ginger are sautéed in a pan before a little spice is added. Carrot and peppers are often added along with fresh coriander stalks and I’ve even seen cabbage added, in fact I’ve used it myself!
The problem I have with the British Indian Restaurant Curry method is that;
1, it usually relies on cooking base sauces and ingredients in bulk and then freezing in portions.
2, it’s best cooking one or two main dishes at a time as it relies on high heat to reduce the base sauce quickly and caramelise in the pan. this is difficult to achieve if like me you are cooking for a family of six (even more if I’m cooking extra for another day!). Also do you want to spend the rest of the night cleaning your cooker top after curry has spat everywhere? I mean it’s bad enough when I just normally cook!
If you’re cooking for just yourself or two people and you haven’t got Kids to look after, the second point may not bother you too much, in fact, I remember those days! If that’s the case you can find some great recipes online. Here’s a couple places to get started:
Curry Personalities
Romain at Glebe Kitchen has some amazing recipes. Easy to follow and explains every stage in detail but without the process sounding like you need a science degree to put some food on the table!
Misty Ricardo has some great recipes on his You Tube channel, or check out his books on Amazon.
Dan Toombs also has some great recipes on his website and again he has a few great books out.
Julian Voigt is somebody else that is worth having a look at. Again he posts lots of ‘how to’ videos on You Tube.
You could also check out The Curry Secret on Facebook.
However If you are like me, sometimes you just can’t be bothered to follow a recipe, and personally I don’t think it’s necessary, if you remember the basics.
And I think the most important thing is that there is no right or wrong way of doing things providing you are getting great end results!
‘Ome Made Curry Masalas
I have just started selling a group of spice blends that are perfect for Indian cuisine, whether you are making traditional dishes or going down the British Indian Restaurant curry route. They are Madras Curry Masala, BIR Curry Masala, Garam Masala and Tandoori Masala.

The BIR Curry Masala is a cheeky little thing. I’ve combined the ingredients you would normally find in a standard curry powder (minus the copious amounts of salt, flour and all the other fillers it would have) and added extra spices that would make up the Indian Restaurants ‘special mix’. Obviously they would add more or less of the curry powder and mix depending on the dish but I have found this is a pretty happy medium and we’ve had fantastic results with it when I was trialling it at ‘ome.
Obviously there are plenty of standard curry powders out there for you to try and it’s really easy to find out what the basics are of a BIR ‘special mix’ powder are if you want to make your own. Or you could just use a standard curry powder without the extra spice mix.
Back To Base!
Now on to the Base Curry Sauce.
If I have the time I do, nowadays, make one.
Do I follow a recipe? No. I don’t always have everything that ‘should’ go in to it so sometimes you just have to go with what you have.
Oh, and here’s a tip. If you really can’t be bothered with making a base sauce try using one of those fresh, chilled Carrot & Coriander soups you find at the supermarket. Never done it myself but I’ve read it gives great results! I have also just developed a Curry Bouillon which is a dried blend of onions & vegetables. This is simply fried for a few seconds before adding water and simmering for 10 minutes. You then have a curry stock which you can add to your curry or use as a substitute for base gravy if you haven’t had the time to make one or you’ve emptied your freezer supply!
So, even though I don’t use a recipe myself, here’s two recipes for a base sauce! If you haven’t got some of the ingredients leave them out or replace with something else. See this recipe as a starting point, adapt and customise it how you will and to your taste. It’s the best way!
The first recipe is a bit more complex. The second is about as basic as it comes and you should be able to memorise it after a few goes. If I was honest I use the second one more than the first!
Base curry sauce No. 1
Makes enough for approximately 12 portions of curry. It will keep in the fridge for 3 days or can be frozen. if you don’t want to make so much just halve the ingredients.
Ingredients;
- 3 tablespoons oil (sunflower, rapeseed, vegetable)
- 4 medium onions, sliced
- 8 fat cloves of garlic, chopped
- 1″ cube of ginger, chopped
- 2 heaped teaspoons mild/medium curry powder/masala
- 1 red pepper (or any other coloured pepper!)
- 1 medium sized carrot
- coriander stalks (if you have them, basically if you are using fresh coriander to finish your curry off cut off the stalks now to add to your base!)
- big dollop of tomato paste (you could use a squirt of tomato sauce if you don’t have any)
- 2 litre of water, ideally hot from the kettle.
- 1 heaped teaspoon of sugar/jaggery/palm sugar
- optional extras; few fresh tomatoes, white cabbage, extra peppers, a little coconut powder (or coconut milk or creamed coconut)
Method.
Heat the oil in a pan and add your onion. fry gently for 10 minutes before adding your garlic and ginger, fry for a couple minutes more. Add the curry masala/powder and fry for a minute or so. If it’s sticking add a splash of water. Now add your carrot and peppers and give a stir around. Add the tomato paste and cook for 20 seconds or so. Add the water and bring to a simmer. Now add the coriander stalks and cook gently for at least an hour (and up to 2 hours). If it’s starting to look a bit thick or the liquid is disappearing just add some more water.

Once all the veg is soft you need to puree the sauce. The best way to do that is with am immersion/stick blender. It can be done in a blender but let it cool a little and don’t overfill!
Once your sauce is blended it needs to cook for 30 – 60 minutes more. it should be the consistency of a thin soup.

Base Curry Sauce N0. 2
This is a handy one for us as it does enough for 6, exactly the number of people in our household! It can be doubled up and again it will keep in the fridge for three days or you can freeze it.
Ingredients
- 4tbsp of oil
- 3 large onions, sliced
- 1 tsp salt
- 3 cloves of garlic
- 1 inch cubed piece of fresh ginger
- 3 tsp ‘Ome Made B.I.R Curry Masala (or another curry masala or 1 tsp each of ground cumin, coriander & turmeric)
- 1.2 ltr water
- a handful of coriander stalks (if you have them)
- 1 x 400ml tin of tomatoes (chopped or whole as they get blitzed)
Method
1. Heat the oil in a large pan. Once hot add the onions and salt and gently fry for 10 minutes or until
the onions are starting to soften.
2. Add the garlic and ginger and fry for a couple more minutes
3. Add the curry Masala or spices, along with a splash of water. Give a quick stir and mix and then
pour in the water
4. Bring to the simmer and cook for 45 minutes, lid off
5. Add the tinned tomatoes and coriander stalks
6. Bring back to the simmer and cook for another 30 minutes
7. Take the pan off the heat and blitz with an immersion blender until you have a smooth sauce
8. Put back on a low heat ready for adding to your curry. If it looks a little thick add some water. It
should be slightly thicker than full fat milk.
9. Use in a curry recipe as directed.
Notes
I have made this sauce in less time than it says, giving it 30 minutes before adding the tomatoes and
coriander and then cooking for only another 20 minutes. It was still good!
Of course you could fry your ingredients off and then add to a pressure cooker or soup maker along with all
the other ingredients and it will still be just as good. Just follow the cooking times for a soup.
This base works really well in a curry when you use the method of adding diluted tomato paste to you
cooked out spices. For 4 people use 2 tbsp of tomato puree diluted in 300ml of boiling water. Add this to
your curry when you have fried your onion, garlic, ginger and spices and let it reduce down so you’re left
with a thick paste. Then you can start adding your base sauce as normal.
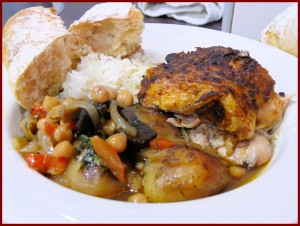
Basic Medium Curry British Indian Restaurant Style.
serves approximately 4
Ingredients.
- 2 tablespoon of oil (not olive) or ghee
- 1 1/2 medium onions, roughly chopped
- 4 fat cloves of garlic, roughly chopped
- small piece of ginger (to taste) roughly chopped
- 4 heaped teaspoons curry masala/powder
- a half portion of Base sauce No. 1 or all or nearly all of base sauce No. 2
- 600g of your main ingredient (uncooked chicken, lamb, vegetable, prawns etc)
- fresh coriander, chopped
- a pinch of garam masala or grind of black pepper
- salt to taste
Method
Blitz your chopped onion, garlic and ginger in a food processor, grinder or blender (you may have to add a little water to help) to make a paste. If you haven’t got a food processor you could use a pestle and mortar or just chop finely.
Heat the oil in a pan and add the onion paste, careful as it may spit a little. Fry the paste gently for 10 minutes or so, don’t worry it will probably turn green!

Add the curry masala/powder and cook gently, if it is sticking add a splash of water, a little at a time. You want the spices to ‘cook out’ the oil will start to split from the paste when this happens and the mixture will spit in little eruptions.
Now add your main ingredient and give it a good stir. Add just enough base sauce to just cover the main ingredients and simmer gently until cooked, if it’s looking a little dry add more sauce. once your chicken, lamb or whatever is just cooked turn the heat up and add more of the base sauce a little at a time until you have your desired consistency. If it’s to thick add a little water. Add the chopped coriander and season to taste with garam masala or pepper and salt.

And that’s it! not exactly BIR style but good enough to give your favourite Indian restaurant a run for their money!
Once you have the basics it’s easy to tweak a recipe to make a lot of different dishes.
There’s some variations you can follow further down the page. Keep Checking Back as I will keep updating and adding recipes and ideas.
Tandoori
The ‘Ome Made Tandoori Masala can be used to make your favourite Tandoori and Tikka dishes.
If you just wanted something quick you can literally rub a little of the Masala in to some chicken, prawns or whatever you fancy before grilling, frying or barbecuing.
For a simple tandoori or tikka marinade just add some of the masala to plain yoghurt to coat your main ingredient.
If you want to go the whole hog, fry roughly 1 heaped teaspoon of Tandoori Masala per 200g of main ingredient (chicken, king prawn, lamb, paneer etc.) in a little oil. This then needs adding to some plain natural yoghurt (Greek yoghurt is fine).
For four people you want roughly 800g of main ingredient and 250g of yoghurt.
If you want a truly authentic flavour add a splash of lemon or lime juice, a teaspoon of grated garlic and ginger, some chopped chilli and coriander. You may want to season with salt and pepper or Garam Masala.

‘Ome Made Tandoori Masala has some beetroot powder in it to give it a slightly more reddish colour but it won’t be the vibrant, garish red that you get in an Indian restaurant. If you want that you need to add a small amount of red food colouring.
To cook I use the oven on a relatively high temperature. Once your chicken, lamb or whatever is cooked, you may want to just give it a blast under the grill to get those nice charred edges. I actually use a blowtorch. Of course if the weather is good Tandoori and Tikka is great cooked over charcoal on the BBQ!

Madras Curry British Indian Restaurant Style
This is as simple as it gets for a British Indian restaurant style Madras curry!
Follow the Basic Medium Curry above to frying the onion, garlic, ginger and spices. Once you have done this add the following;
400g chopped tinned tomatoes (blitz smooth in a blender or food processor if you want a restaurant style curry)
2 Tablespoons Tomato Puree
Cook this for a couple minutes then add your main ingredient. Add a little water or base sauce to thin the sauce a little then leave to cook.
Once your main ingredient is nearly cooked you need to add the coriander, garam masala, salt and the following;
1 tablespoon ground almonds
2 tablespoons of lemon juice, fresh is best but bottled will be fine
3 teaspoons of sugar
2 – 3 teaspoon of chilli powder.
Cook for another 15 – 20 minutes before serving. Simple!
Ceylon Curry British Indian Restaurant Style
Again follow the above Basic Medium Curry recipe. go easy on the base sauce as you are adding more liquid later.
once your main ingredient is nearly cooked add the following;
1/3 of a block of creamed coconut (i usually grate it straight in t the pan) or 3 tablespoons of coconut milk powder
150ml of milk
1 tablespoon of lemon juice, ideally fresh but bottled will work as well.
1 – 4 fresh green chillies chopped (or more or less to suit your taste)
cook for a couple of minutes before adding the garam masala, salt and fresh coriander and cooking for another 15 minutes or so before serving.
Again once you have mastered the basic recipe for a curry you should be seeing now how easy it is to tweak it and make lots of variations.
Chicken Karahi
Ok, this is another easy adaptation to a basic medium curry.
To me Karahi is about the lovely fresh taste of ginger along with some nice fresh peppers and tomatoes. I usually add fresh chillies as well. To be fair when you add fresh chillies this dish is virtually indistinguishable from a Jalfrezi so this is almost a two in one curry!
So follow the recipe for medium chicken curry above EXCEPT add more fresh ginger. You want a piece roughly as big as your thumb. Also add a teaspoon of turmeric powder and 1 teaspoon of chilli powder (more if you like it hotter) when you add your curry masala.
about 15 minutes before you’re ready to dish up add some chopped peppers (1 red, 1 green or whatever you have), 4 tomatoes cut in to quarters and some optional fresh chillies, and of course the chopped fresh coriander.
I’d love to see and hear about your own variations. Remember to post your creations on my Facebook page – www.facebook.com/omemade or Twitter account @Omemade
Remember to keep checking back here as I will add more recipes!


