Spicy Crispy Lamb Breast


Spicy Crispy Lamb Breast… this was an absolute winner!

I’m quite a fan of lamb breast, a very underused and under rated cut of meat.

I think a lot of people are put off by the appearance (there appears to be very little meat) and they don’t know how to cook it.

Spicy Crispy Lamb Breast I normally roll it with a nice stuffing to soak up the juices and make it go a bit further.

On this occasion I remembered seeing a recipe where the breast was cooked without being rolled so that it went nice and crispy, so I thought I’d give it a go with a nice spicy coating.

‘Ome Made Spicy Crispy Lamb Breast.

We were not disappointed! I used three lamb breasts which did me, Kit and the four hungry Kids and then there was some leftover for lunches.

It does reheat really well and goes even crispier!

The recipe below is for one lamb breast so double it for two or treble for three… There’s nothing like stating the obvious is there, sorry!

Lamb breast needs to be cooked slow to render the fat down and give you tender meat so this was cooked in two stages the first with the marinated meat cooked in a low oven, wrapped in tinfoil. The oven temperature was then turned up and the lamb finished off uncovered.


Before you cook the lamb breast you need to remove the thin bit of film that covers the inside of the ribs as it tends to be a bit tough. If your not confident about doing this ask the butcher to do it.

Talking of ribs the breast can be cooked with or without them.

Our Kids love the ribs when they are removed after the meat is cooked!

As far as flavourings you could use any mixture you like. I stuck with cumin, which goes fabulously with lamb, chilli and garlic as the main focus.

Of course you could use a ready bought mixture from the shop such as Ras el Hanout or of course any of the ‘Ome Made seasonings and rubs which are available at www.omemade.co.uk.

‘Ome Mades Moroccan Rub-a-Dub-Rub would be ideal for this recipe.


Spicy Crispy Lamb Breast 

1 Lamb breast

splash of lemon juice

2 cloves of garlic crushed

2 teaspoon ground cumin

1 teaspoon chilli powder

1/2 teaspoon salt

lots of ground black pepper

A little oil of your choosing

Prepare the lamb breast removing the film and any big lumps of fat. lightly score the meat (SEVERRRN!… Sorry!) and any fat to help the marinade penetrate the lamb. Splash a little lemon juice over the lamb and rub in. Put the crushed garlic, spices and seasoning in a bowl and add enough oil to make a paste. Cover the Lamb Breast with the paste and give it a good rub in. leave to marinate in the fridge for up to 24 hours if you have the time, however the meat can be cooked straight away and still taste good! When ready to cook wrap the lamb breast in a couple pieces of tin foil and place in a roasting dish. Place in a preheated oven at 145°C/125°C Fan for around 3 hours.


After this time the meat should be cooked and tender and the soft fat will have rendered down giving incredibly moist, tasty lamb.

Turn your oven up to 200°C/180°C Fan.

Remove the lamb from the tin foil and place on a wire rack (if possible, will be fine if not) in a roasting pan.

Once the oven has come up to temperature put the meat back in. After 15 minutes turn the meat over and leave for another 10 – 15 minutes or until you have a nice crispy finish to your lamb.

Spicy Crispy Lamb Breast


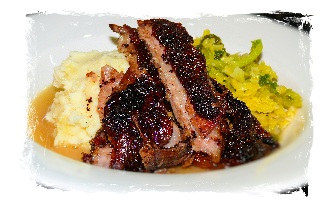
Remove from the oven and let rest for 15- 20 minutes before slicing into strips to serve.  


We served the crispy strips of lamb breast with some mashed potato and garlicky sautéed cabbage… Winner!


Spicy Crispy Lamb Breast

Don’t forge to check out the range of ‘Ome Made rubs & seasonings at our online shop; www.omemade.co.uk

‘Ome Made Falafel


Falafel are great… or can be if they’re made right! The thing is you need to put bags of flavour in there. You need serious amounts of garlic, lemon juice, pepper and salt. And then of course there’s the spices. For me it has to be heavy on the cumin, probably my favourite spice and a little paprika and ginger help give an extra zing to the proceedings. A good handful of fresh herbs give the finishing touch.

Falafel are surprisingly easy to make. The main ingredient, chickpeas, are incredibly cheap too!

I like to have Falafel just as they are accompanied by a nice salad, maybe some Tabbouleh and lashings of Tzatziki Oops, I’m beginning to sound like a vegetarian!

Once cooked they can also be warmed in a sauce, a nice rich tomato sauce works well. They’re almost like a vegetarian version of a meatballs.

So here’s a recipe you can follow to make your own. It uses dried chickpeas which have to be soaked overnight. I’m sure if you wanted you could cheat and use tinned, if you do you’ll want about double the amount of dried.

‘Ome Made Falafel

You will need:

  • 500g dried chickpeas
  • 6 cloves garlic finely chopped
  • 1 medium onion finely chopped
  • 3 teaspoons ground cumin
  • 1 teaspoon ground coriander
  • 1 teaspoon ground ginger
  • 1 teaspoon paprika
  • 1 teaspoon chilli
  • 1 tablespoon chopped fresh coriander
  • 1 tablespoon lemon juice
  • 1 teaspoon dried mint
  • 1 teaspoon allspice
  • 1 teaspoon salt
  • Freshly ground black pepper
  • 1 heaped teaspoon baking powder

Method.

Soak the chickpeas overnight. Drain and rinse the chickpeas then grind to a course pulp in a food processor.

Mix in all the other ingredients using your hands to really work the mixture together.

Form into 4cm balls and place on greaseproof paper on a tray in a single layer.

To cook the Falafel are best deep fried or shallow fried and then finished off in an oven.If deep frying the oil wants to be around 160°C so that they will cook through without the outside getting too well done Take the Falafel out of the oil when they are firmed up and just starting to colour. The Falafel can be par cooked like this and then cooled and refrigerated or frozen. The Falafel can then just be popped into an oven to finish cooking.

Alternatively the Falafel can just be deep or shallow fried.

‘Ome Made Kebab

‘Ome Made Kebab

I have been fond of kebabs since my beer swilling teenage years… You could not beat that garlicky, salty meat stuffed into a pita with slice cabbage, grated carrot, raw onion, sliced tomato and cucumber then drizzled with lemon juice, yoghurt & mint and hot chilli sauce after a night out on the beer!

Of course once I had kids, nights out were a thing of the past and a greasy donner kebab became something I’d have once in a blue moon.

Kebab

And then I noticed that when I was having them I was enjoying them less and less. The meat seemed to have less flavour, you got less salad,yoghurt and mint seemed to not be an option and ask for lemon juice and you got funny looks. And why can’t you get a kebab in a pita anymore?

It seems that a lot of takeaways standards have dropped these days. And to be fair there is a lot of dubious establishments out there selling things they shouldn’t be to make a bigger profit. Not that I want to tar all takeaways with the same brush… there are of course some excellent takeaways out there.

The thing is, sometimes you just fancy a kebab. So it’s handy to be able to make your own.

If I had my way I would have a big rotisserie spit in one corner of the kitchen but I don’t think Kit would approve!

'Ome Made Kebab


So how do you get something that tastes and has the texture of a Doner meat?

I’ve found the best method is what I refer to as ‘The Big Sausage’ method!

So here’s how you make it;

You will need

1 kilo lamb mince (or beef, or a mixture)

3-4 cloves of crushed garlic

1 teaspoon salt

3 teaspoon ground cumin

1 teaspoon ground coriander

1 teaspoon chilli powder

1 teaspoon cinnamon

1 teaspoon dried oregano

Plenty of black pepper

1/2 tablespoon oil

Put all the ingredients in a large mixing bowl. The best way to mix is with your hands, so get in there and give it a good squish. The more like a paste you can get it the better.

Once all the ingredients are well combined get a large sheet of greaseproof paper and a large sheet of tinfoil.

Lay the greaseproof paper on top of the tinfoil and then get your meat mixture and lay it out in a line, round about 12” long. Now mold the meat into a ‘Big Sausage’ shape. Once you have a rough sausage shape you can roll it in the greaseproof paper to get it nice and round and compact. Wrap your ‘Big Sausage’ in the greaseproof and then the tinfoil. Lay the package on a baking sheet or dish (some juices may escape) and put in an oven at about 165°C (145°C for fan assisted)for around 80 – 90 minutes.

The meat will now be cooked. To serve slice the meat thinly and place on a baking sheet before giving it a flash under a hot grill.

Kebab

The meat can then be served in a pita bread with Turkish Salad, yoghurt and mint and of course a good dollop of chilli sauce (preferably ‘Ome Made!) or as I’ve done here in a gigantic Naan bread which is then rolled up and sliced (and by the way if you wrap it tightly in cling film and put in the refrigerator overnight, it slices really nice and is ideal served cold on a picnic or as pack-up).

Not All Pirates Eat Meat!

I was winding an old friend up a couple weeks ago who happens to be a Vegan, he also bears an uncanny resemblance to Jack Sparrow, especially when he gets the full costume on…come on, stop swooning ladies!

Jack Sparrow aka Steve

Anyway to make it up to him I promised I would put a post on the Blog that featured a Vegan recipe. So Steve… ahem, sorry, Captain Jack ‘A-Hoy mi seafarin’ shipmate. Shiver mi timbres an get ya cooking pot at the ready!”

Ok it might not be Salmagundi (every pirates favourite) but it is Vegan and it’s packed full of protein which sometimes can be lacking in a Vegan diet

‘Ome Made Houmous (Hummus to our friends over the pond…) with Pitta Bread & Turkish Salad

Houmous is dead easy to make and so much better than shop bought. My recipe makes a lot! It’s easy to halve or quarter the recipe though. Or you could freeze the extra. It will keep in the fridge for up to ten days providing its in a sealed container.

For the Houmous you will need:

500g dried chick peas soaked overnight (you can use canned)

1 jar Tahini (300g)

About 10 cloves of garlic (or more or less depending on your taste) chopped    houmous 3

Zest & juice of of two lemons

About 200ml olive oil or sunflower will work fine too

Plenty of slat and freshly ground black pepper

Ground paprika

To Make:

Drain and rinse your chickpeas. Place in a deep saucepan and cover well with water. bring to the boil and boil for ten minutes. Remove any scum that floats on the surface.

After your chickpeas have boiled for ten minutes, turn down to a simmer and cook for another 45 minutes or until tender.

Once cooked, drain and let the water evaporate from them while you prepare the rest of the ingredients.

Houmous 1

Once your chickpeas have cooled a little mix all the ingredients, except the paprika, in a large bowl and put through a blender or food processor or if your a true pirate you can use a masher or the back of a fork, it will just end up a little more course. If the mixture is a little dry and thick you can add a little more oil or some cooled down boiled water.

houmous 4

Once your Houmous is ready put into a serving bowl and sprinkle with a little paprika.


For the Pitta Breads you will need:

(makes 8)

350g strong white bread flour

1 teaspoon salt

2 teaspoons dried yeast

2 tablespoons oil (olive or sunflower)

250 ml warm water

1 teaspoon sugar


To make;


Mix the sugar yeast and water together in a jug. After 10 – 15 minutes it should have a nice foamy head.


Mix the flour and salt together in a large bowl. Add the olive oil, make a well in the centre of the flour and pour your water/yeast in. mix together to form a soft dough. take out the bowl and give a knead for a good 5 minutes using a little more flour if the dough is still sticky.

Put back in the bowl and cover with a damp cloth or cling film. Leave for an hour to rise.

Put your oven on the hottest setting it will go on

Once ready knock back the dough and knead again until smooth. Divide the dough into eight balls and then roll each out into an oval about 1/4” thick. Place on a greased baking sheet and leave to prove for 10 minutes.

Cook the pittas in the pre-heated oven for about 1 – 1 1/2 minutes each side. When ready wrap the Pittas in a clean tea towel to keep warm.


To make the Turkish Salad

Finely shred 1/2 a white cabbage. Grate one or two carrots. Slice one medium sized onion.

Mix the cabbage, carrot and onion in a bowl. Sprinkle approximately two teaspoons of salt and the same of sugar over the salad and mix again.

Squeeze the juice of one lemon or a tablespoon of bottled over the salad and a couple dashes of white wine vinegar. Give the salad a good grind of black pepper and a pinch of ground cumin., mix again and the salad is ready to serve. It will keep for a good five days in the fridge.


To serve split your warmed Pitta breads and spread liberally with the houmous. Pack in as much salad as you can. You know have a Vegetarian/Vegan equivalent of a Kebab! You can of course sprinkle some Chilli Sauce (in our case, ‘Ome Made) over and it does benefit from some yoghurt and mint (but then that wouldn’t be vegan).

So there you have it. ‘Ome Mades first ever Vegan recipe.

“Aaaaar enjoy mi scurvey kerr!”houmous 2


Sweet Potato & Red Chili Soup


Sweet Potato and Chilli Banner

Soup… We absolutely love it in our house. Not the tinned variety of course. It has to be ‘Ome-made! And it’s so easy to make. You take your favourite ingredients sweat them off in some butter add some stock, cook for a bit and then blitz. Not leek and potato soup though, that can’t be blitzed. That’s completely breaking the rules, that has to be… ‘lumpy’.


If you make your own stock it’s even better. Even if it’s chucking the bones from the leftover roast chicken in a pot and boiling for an hour, you will be left with a nicechicken stock blog base for a soup. Of course if your one of those non-meat eating types you can make a stock from those manky left over carrots at the back of the fridge any veg trimmings and some onion. If you roast the veg for 20 minutes or so you’ll get more flavour and a deeper colour to your stock too.


So heres a recipe for a soup I made the other day along with a recipe for some cumin, ginger and garlic croutons. If you don’t have the croutons with this soup I suggest putting the spices used to flavour them in the soup. Although this recipe has chillies and spices in it it is no way spicy. If you prefer it spicier just up the amount of red chili in the recipe.

  croutons blogcoriander and chilli blog

Sesoning Blog


Sweet Potato & Red Chili Soup


Ingredients 


50g butter                                                       Diced Potatoes Blog

1 medium onion roughly sliced

2 cloves of garlic roughly chopped

200g (a large baker) potato cubed

700g sweet potatoes (4 small or 3 medium)cubed

1 large carrot diced

1 teaspoon ground white pepper (or extra black if you haven’t)

1 teaspoon salt

1 heaped teaspoon mild curry massala (or curry powder)Diced Carrots Blog

1 teaspoon ground allspice

1 teaspoon dried thyme

2 litre of stock

2 medium sized red chillies deseeded and finely chopped

1 tablespoon chopped coriander

Ground black pepper and salt to taste


Method


Melt the butter in a heavy bottomed pan. Gently fry the onion and garlic for about 10 minutes.

Sweet Potato Sweating Blog

Add both types of potato and carrot to the pan along with the white pepper, salt, curry massala, allspice and thyme. Gently sweat all the veg off for a further 10 minutes stirring so the spices don’t stick and burn.

Add your stock which should just cover the vegetables. Bring to a simmer and cook for approximately forty minutes or until all the veg is cooked through and soft. Take off the heat and carefully blitz with a hand blender, blender or food processor.

Put back on the heat and add the remaining ingredients. The soup will be ready after 20 minutes.

 Sweet Potato Soup Blog


Cumin Ginger & Garlic Croutons


8 slices white bread

Olive oil

2 teaspoon crushed garlic

2 teaspoon cumin

1 teaspoon ground ginger

Salt and black pepper


Method


Cut the bread into cubes and put in a shallow roasting/baking tin.

Drizzle with oil and sprinkle with the garlic, cumin and ginger. Give the croutons a good toss and then sprinkle a little more olive oil on them and toss them again.

croutons cooking blog

Put in an oven preheated to 165°C on fan setting (185°C for conventional)the croutons will take 30 – 40 minutes but you need to regularly check on them and give them a shake or turn every 10 minutes or so.

Once the croutons are cooked they can be used straight away. Once the croutons are completely cool they can be put in a sealed container where they should be good for up to five days.

Sweet Potato Soup Banner

Happy soup making!


‘Ome Made Curry Secret II

I’ve already  done a post on making your own curry masala. I thought it was about time I did one on making a curry sauce.

If you’ve had a go at making your own curry masala that’s great but if not then this can be made with curry powder, paste or a basic mix of spices that I will put in the recipe.

One of the most important processes in making a good curry sauce is the cooking of the onions. The idea is to cook as much water out of the onions as possible.

My method for doing this is to puree the onions, along with the garlic and Dj stirring blogginger, in a liquidizer or food processor before they are cooked. If you haven’t got a liquidizer or food processor the onions, garlic and ginger can be cooked and then a hand blender can be used to puree your sauce at a later stage. If you have none of the above appliances you can still make a good curry, it just won’t have that texture of an Indian restaurant cooked curry.

With the following recipe don’t worry about exact quantities, it’s more about the technique and I’m sure most people will customise the recipe to their own taste.

Once the sauce is made it’s up to you what you want to serve in it. I will also give some pointers on how to turn this basic curry sauce into your favourite Indian curry.


Basic Curry Sauce (enough to feed four people with about 1lb/500g of main ingredient)


1 large onion (or 2 medium) roughly chopped (finely chopped if you have no way of pureeing).

3 big fat cloves of garlic (or more if you’re a real garlic fan) chopped roughly

2oz fresh ginger (a piece as big as your thumb) chopped

1 teaspoon of cumin seeds

1/2 teaspoon fenugreek seeds

1 level tablespoon of curry masala/powder/paste (or 1 level teaspoon of ground cumin, coriander, paprika, cinnamon, turmeric, ground ginger and chilli powder)

1 teaspoon sugar

1 teaspoon salt

1 tablespoon tomato puree

1 240g tin chopped tomatoes

1lb/500g of main ingredient (chicken, lamb, beef, prawn or vegetables)

Chopped fresh coriander to finish the curry off (and some turmeric, allspice, dried mint and garam masala)


Method


In a liquidizer/food processor/blender puree your onion garlic and ginger (they can be mixed)

In a large pan put about 6 tablespoons of oil (not olive or anything else strong flavoured). If you have ghee that’s even better.

Gently heat the oil and add the whole spices. Fry for about 30 seconds.

Add the onion, garlic and ginger. Fry gently for about 10 minutes.

Add your masala/curry powder/paste and fry gently for a minute or so adding a splash of water if it’s catching.

Stir in the tomato puree and again cook for a minute.

Add the salt and sugar.

Now add some water to the pan (about 500ml). Bring to the simmer and cook for about 20 minutes until the mixture has reduced and quite thick again.

curry cooking blogIf you didn’t puree your mixture earlier then you can puree the sauce now using a hand blender.

The chopped tomatoes can now be added (if you want a really smooth sauce you can blend again).

The sauce should be a nice thick consistency, if it’s too thick add a bit more water or stock.

Bring the sauce to the simmer and add your main ingredient.

Diced chicken will take around 20 – 30 minutes to cook. Diced lamb wants to cook for a good 75 – 90 minutes. If you are doing a vegetable curry I would par-cook the vegetables and then finish them off in the sauce for the last 20 minutes.


20 minutes before your curry is ready add the chopped coriander and a pinch of all spice, turmeric and dried mint and a teaspoon of garam masala.

Check for seasoning and add a little more salt if needed.

If the sauce is a little runny finish the curry off on the hob without the lid on.

I have to mention at this point that as I am writing this Kit is preparing some onions for a curry tonight. I also have to mention that Kit has forgotten to put the lid on the blender when pureeing the onions… I don’t think I have to mention that the kitchen is now covered with onions!

Anyway, where was I… Yes cook for a further 20 minutes and your curry will be ready.


Variations


The above recipe makes a medium strength curry but it’s easy to adapt and add other ingredients to make different variations.

For a Madras add 1 tablespoon of lemon juice (fresh or bottled), 1 tablespoon of ground almonds and 2 teaspoons of chilli powder 20 minutes from the end of cooking.

For a Korma add 1 tablespoon ground almonds, 3 tablespoons of cream and 2 teaspoons of sugar 20 minutes from the end of cooking.

For a Dupiaza fry 1 teaspoon of cumin seeds, 1 roughly chopped onion until caramelised add to the curry 20 minutes before the end of cooking.

For a Rogan Josh toast some flaked almonds, roughly chop 4 large tomatoes and add to the curry 20 minutes before the end of cooking.

For a Jalfrezi add 4 roughly chopped tomatoes, 6 chillies roughly sliced and two teaspoons of turmeric 20 minutes before the end of cooking.

For a  Tikka Massala  add 1 tablespoon tomato ketchup, 2 tablespoons of cream and 1 teaspoon of sugar 20 minutes from the end of cooking.


Or of course you can experiment with your own ‘add ins’!


I can especially recommend a curry made with the leftover Christmas turkey, cranberry sauce and cream… to be honest I think it went down better than the Christmas dinner itself!


Speaking of Christmas… I still haven’t done the cake or pudding!

Hands, Knees & Bumpsy-Daisies….

Reyt Good All Purpose Seasoning by Ome Made

After a week of banged heads, broken teeth, teeth going through lips, split chins, bumps and grazes I’ve decided never to take our Kids out of the house again!


Trying to get 4 children (one badly injured) with 4 scooters on a bus with only a £20 note to pay the bus fare with so that we can get home, get in the car and get to the dentist to fix Lil’MrM’s tooth was, I have to say, a bit of a trial. Why do these things always happen when ‘Ome’s not there??!!! I’m good at these kind of situations when it’s someone elses kids but I panic & crumble when it’s my own. But to give the Kids their dues, they were fantastic whilst Mummy had a total breakdown. Oh the joys of being a parent!


I then retreat into my veg patch, large glass of wine well within reach and thank the last of the garlic, the sorrel, beans and courgettes that need picking, the beetroot and swede that have survived their late start and flowering pumpkin plants for not causing me any grief, stress or tears.


I have to admit I did feel a bit tearful when I decided I’d have to chop down the borage plant. It almost signals the end of summer.

borage blog

It was so easy to grow it was astonishing. From 1 plant hundreds of flowers have been picked since May and added to salads, frozen in ice cubes and ice lollies, added to drinks (Pimms for us!) and generally used as Pick-Your-Own snack for the kids. Happy memories of summer.


It’s not all sadness though because when cut down, chopped up a bit and dug into the veg patch it will serve a further purpose by enriching the soil in readiness for more plants to grow as strong as the borage was.


Come next spring I can guarantee borage will be the first on my list to be sown in time for warmer weather, water fights and ‘Ome Made Pimms on the lawn!


Kit x

Venison Chilli

Our Butcher sometimes gets some very nice wild venison in. When he does we always make sure that we get some venison neck in, we usually buy quite a bit for the freezer. Venison neck when cooked long and slow is great. It makes fantastic curries but this was a first for us. I can honestly say though that this chilli was one of the finest I’ve ever tasted!venison chilli blog

We put this in the oven at 165 C and then turned it straight down to 115 C and there it stayed for a good eight hours! I don’t see why it couldn’t be cooked for less time on a higher heat though? I would say that at 165 C for four hours would be fine, any less I would expect the venison not to be quite so melt in the mouth.

This recipe gives a medium (to us!) heat level. Although our kids like spicy, too hot and they start to grumble. Kit and myself simply added some ‘Ome-Made Chilli Sauce to ours.

If you can’t get venison neck you could always do this recipe with chuck steak or even beef shin would give a good result. There is no reason why you can’t even stick to the traditional minced beef.

You will notice that the recipe makes a lot but if your going to have the oven on for that amount of time you may as well do extra! It freezes and reheats well so gives some hassle free meals in the future.

Venison Chilli (makes approximately 12 portions)

1 kilo/2lb Diced venison (or meat of your choice)

500g/1lb dried beans (I used red Kidney beans and pinto beans) soaked over night or couple tins of beans of your choice

4 big fat cloves of garlic, choppedvenison chilli cooking blog

3 medium onions

3 teaspoons ground cumin

3 teaspoons chilli powder (I used 1 standard hot, 1 new Mexico and 1/2 of bhut jolokia but not everyone has these hanging about in there cupboards)

1 tablespoon dried oregano

1 large glass of red wine (or anything else ‘moist’, beer, lager or even cola), don’t forget one for yourself too!

2 tins (280g in total…ish) tomato puree

1 400g tin chopped tomato

2 tablespoon sugar (granulated will do)

3 beef stock cubes or 1 tablespoon beef bouillon or some strong beef stock (approximately 1/2pint/280ml)

50g of seriously dark chocolate (at least 70% but I used 85%)

Plenty of freshly ground black pepper and salt to taste


Method

Drain and rinse the soaked beans put in a pan, cover with water and bring to the boil. Boil for ten minutes then drain.

Heat 2 tablespoons oil in a large pan

Fry the garlic and onion until soft

Add the spices and continue to fry for a couple minutes, if they are catching add a splash of water.

Add your meat to the pan and brown, stir in the oregano and season with salt and pepper.

Add your wine or beer (if you haven’t drunk it all yet!) and whack the heat up to reduce the liquid to a nice thick consistency.

Reduce the heat and add your tomato puree and cook for 2 minutes or so now add your tomatoes, sugar, stock cubes (or stock) and par-cooked beans (if using tinned add an hour before serving) and enough water to cover everything + 1/2 inch, bring to the simmervenison chilli chocolate blog

Break your chocolate up roughly (remembering to taste to check for quality!) and sit on top of the chilli, let it melt slowly before stirring it into the liquid. now put a lid on the pan and put into a pre-heated oven at 165 C/330 F and then turn down to 115 C/240 F where it will stay for eight hours (or less if you decide to cook on a higher temperature, see above)

Go and enjoy the rest of your day knowing that all you have to do for tea now is cook a bit of rice!


Pimms, Friends & Slow Cooked Lamb


We hadn’t seen a friend of ours (an old neighbour) for a while, and we still had half a bottle of Pimms in the pantry that he had bought up on his last visit!

We seemed to be having a good run of weather so we thought it was time to invite him round for Pimms and a bit of decent nosh.Pimms! Blog

We decided to do slow roasted lamb, Middle Eastern style with Turkish salad, Tzatziki, ‘Ome Made Chilli Sauce and pitta breads.

I started the lamb off in the oven but finished it off in the smoker which gives it an incredible flavour. There’s a video on the Blog and You Tube (OmeMadeByUs) of me preparing the lamb (if you want a chuckle!)

We also had lots of Pimms which was great because we had plenty of fresh Borage leaves and flowers to put in (so much better than cucumber!)borage blog

So here’s the recipe for the lamb;

Slow Roasted Lamb Middle Eastern Style

1 x whole shoulder of lamb (leg works as well, but I prefer shoulder for slow cooking, you could also get a half shoulder but the leftover meat is great to use in other dishes)

Marinade (don’t be scared to experiment with these ingredients, they’re only a rough guide)

garlic 3 – 6 cloves (depending on taste) finely chopped/crushed

ginger – 1 inch piece finely chopped

chilli powder 1-4 teaspoons (again depends on taste)

Cumin powder 3 teaspoons

cinnamon 1 teaspoon

all spice/pimento 1 teaspoon

dried mint 1 teaspoon

2 teaspoons of saltlamb flatbread

lots of black pepper (grind until it hurts!)

Juice from a lemon (and zest) or two table spoons bottled lemon juice

1 tablespoon oil (I tend to use olive for this but anything goes)

Method

Mix all the marinade ingredients together (you can use ready bought Ras el hanout mix instead of the individual spices if you want).

Slash the meat with a sharp knife so the flavours penetrate the meat and then rub in the marinade… vigorously! Go on slap it on! The meat would benefit from being left in the marinade overnight if you have chance to prepare the dish a day in advance.

Put the meat in a roasting pan with a couple tablespoons of water and then cover tightly with tin foil (it’s sometimes a good idea  to use two pieces)

Put in the oven at 165 C/330 F  to be ready after 6 hours or 145 C/290 F to be ready after 8 hours (either way you could leave it for a couple hours longer and it will still be fine).

This is a great dish to do if you are out for the day or at work and you want to come in to have something practically ready to eat!

This has to be one of our household favourite meals. It’s like an up-market kebab! I don’t remember having Pimms before my late night kebab when I was younger though!

‘Ome-Grown Onion & Garlic the lazy way.

Growing your own fruit & veg can seem very daunting & hard work but, believe me, it isn’t!

I put my hands up & admit I am the laziest gardener ever. I break all the rules but somehow manage to get results.

I found the easiest way to get started is to choose something to grow that doesn’t take much maintenance….for me tomatoes wasn’t it! What the hell are the side shoots I’m meant to be pinching out?! Why are the tomatoes the size of bumble-bee baubles??!!! Why aren’t they turning red???

So I started with garlic & onion. Dib a few holes in your ‘plot’ in September, October or November, stick in your onion & garlic thingys & then leave alone. Depending on how cold it gets (I seem to find that the colder the winter the better the crop) you’ll be harvesting your crop in June, July & August time. The only hard work is pulling out a few weeds in springtime. You can grow loads as well as when you pull it up you can tie it together with string & hang it outside. When it rains it will wash all the muck off & when it’s dry & sunny it will dry the outer skins & then it can be stored in a cool, dry place. See, hardly any work or fuss or stress.Ome grown garlic blog

The satisfaction of cooking with your own freshly pulled garlic & onion is fab. Also, try pulling up a garlic thingy in February or March time (this is called ‘Wet’ garlic), chop it up & add it to any naan bread you are making…AMAZING!

Finding that I actually enjoy growing, cooking & eating our ‘Ome-Grown stuff & I became brave & moved onto the hardened gardeners stuff……..I’ll be getting a poster of Percy Thrower to adorn my bedroom wall next 😉


Kit x